Monday, May 16, 2011

Final Reflection

http://www.flickr.com/photos/60133912@N06/sets/

The semester has come to an end and now it’s time for me to reflect on what I’ve learned.  Like most studio courses there where times when I succeeded and other times when I struggled.  This course was very informative and I learned a lot about drawing the human body.  I found life drawing to be one of the more challenging art studio courses that I have taken. 
I still remember the first day of in-class drawing.  I left that class with an extremely tired shoulder from producing so many gesture drawings.  Although I didn’t like them at first, I soon noticed their beneficial factors.  It’s interesting that in most cases my gesture drawings are proportional accurate.  Gesture drawings are the foundation to life drawing and it’s important to be able to capture an entire pose in under a minute (Gesture Drawing 1).
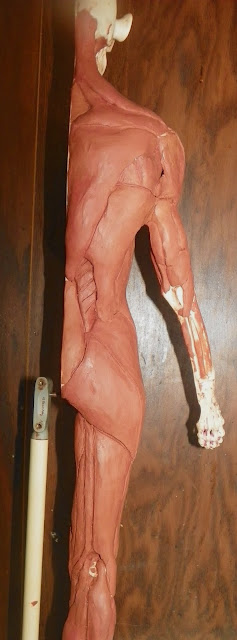
Aside from gesture drawings, the manikin was another important aspect of the course.  I spent several hours each week building clay muscles.  This allowed me to develop a deep understanding of the human muscular system and also helped me identify and accurately depict the muscles during drawings.  I worked hard on my manikin and I’m very satisfied on it turned out (Manikin 1).
The last major component of this class was based on long drawings.  This is where I was able to develop some very beautiful drawings.  Along with the beautiful drawings came struggles.  Throughout the course I struggled with contour lines and foreshortening.  I did my best this semester at trying to make theses components feel easy, but I still find them very difficult.  They are the more challenging aspects of drawing.  Overall, this course was a good learning experience and will help me become a better art educator.


Sunday, May 8, 2011

One Week Left


          My spring semester is coming to an end, and that means there is only one week of life drawing left.  It’s surprising how fast the semester has gone by.  This course has taken a lot of hard work, but it was worth it because I’ve learned so much about drawing the human body.  At this point in the semester, I’ve learned about every section of the body.   Now it’s just a matter of connecting all the pieces together. 
I had two class periods last week, the first day I spent most of my time working on my manikin, and the second day I focused on drawing.  One component of life drawing that I really enjoy is creating gesture drawings.  My favorite time length is around five-minutes.  This allows me to quickly capture the gesture, but also provides enough time for me to reevaluate my drawing and make adjustments.  It’s interesting how some poses are relatively easy while others are very challenging.  Most of the difficult gesture drawings evolve a certain degree of foreshortening.  Foreshortening is a component of life drawing that I’ve been struggling with the entire semester.  I’ve also had several issues with developing contour lines.  I understand were most of the mussels are in the body, but I find it very difficult to create contour lines to show them.  I believe contour lines are one of the more challenging aspects of drawing in general.  It’s an element of drawing that takes a lot of practice to become good at.
            Aside from drawing, my manikin has been a wonderful learning experience.  I finish the last mussels this weekend, and believe the finished product turned out very good.  I spent a lot of time making sure the mussels were built accurately.  I even ended up having to rebuild several muscles.  I had some issues with the forearm becoming too bulky and had to shave some of the muscles down. 


Friday, April 29, 2011

The Face

The majority of my time last week was spent learning about the human face.  I spent time both in and outside of class learning techniques to help me create realistic facial features.  It was an exciting week because I have been looking forward to learning how to draw the face the whole semester.  It’s a skill that I have always wanted to become better at. 
            When I begin drawing the face, I find it beneficial to do some short gesture drawings in order to understand the perspective and proportions of the facial features.  Once I have a general understanding of the layout of the face, I start my longer drawing.  I start with the shape of the head; this is an oval shape that is slightly wider at the top than on the bottom.  Then I create a vertical line down the center and a horizontal line halfway between the top and bottom of the oval.  This horizontal line is used for the placement of the eyes.  I then create another horizontal line to divide the remaining space below the eye line.  This line is used for the location of the nose.  The remaining space below the nose can be divided in half with another horizontal line.  This is used for the placement of the mouth and allows enough room for the chin.  These simple lines help me keep the face balanced and proportional.  The placement of the ears starts slightly above the eye line and ends at the bottom of the nose.  I find the eyes, nose, and month very difficult features to draw.  I understand the general shape of these facial features, but I find myself continuing to rework my drawings because I don’t feel they are realistic enough.  It really takes time to develop a nice drawing of a face.  It’s important that the face is proportional, realistic, and has a three-dimensional appearance.  It’s easy to have a drawing appear flat and not life like. 

Tuesday, April 26, 2011

Skull

Last week I spent most of my time working on the head and the skull in particular.  The human skull is a bone structure that supports the face and brain cavity.  The skull of a typical adult consists of 28 bones.  Every bone besides the mandible is joined together by sutures.  Sutures are non-movable joints that are made of bone fibers that allow flexibility.  There are 8 bones surrounding and protecting the brain, 14 bones to support the structures of the face, and 6 bones in the auditory ossicles of the middle ear.  There are slight variations between the male and female skull.  A male skull typically has more prominent ridges and temporal lines.  The female skull generally has rounder orbits and a narrower jaw.  Males often have larger mastoid processes and sinuses.  The last major difference is that the male mandible is typically squarer and thicker.
 I had two class periods last week to create three longer drawings of the skull.  Each drawing was from a different point of view.  The hardest drawing was the back three-quarter view.  I found it interesting how small the face is compared to the rest of the skull.  In my drawings prior to this class, I often focus on the face and frequently made the eyes, nose, and mouth to large.  Drawing the skull allowed me to understand the proper proportions of the face.  After completing my skull drawings, I soon noticed that the skull has a unique shape.  I now understand how the jaw moves and where the eyes fit in the skull.  I always assumed that the eyes extruded from the skull, but I now understand that they are push back and are slightly behind the forehead and cheekbones.  Overall drawing the skull was  interesting and a very good learning experience.


Sunday, April 17, 2011

Long Drawings and Hands

I was able to get a lot of in class drawing time this week, which was nice because lecture and building clay muscles can sometimes limit on how much I get to draw.  The first part of the week I continued working on the arm and forearm, and the second half was spent drawing hands.  I was able to do an hour long drawing both days this week.  In my first long drawing, the model was facing me, and I was having some issues with foreshortening, but my instructor Any Fichter helped me resolve my problem of not making the knees large enough.  They needed to be larger then I expected because they were closer then the rest of the body.

 The human hand is made up of 27 bones!  The carpus is commonly referred to as the wrist accounts for 8 bones.  The metacarpals or palm is made up of 5 bones, and the remaining 14 bones are in the fingers and thumb.  Without this complexity, we wouldn’t be able to operate such a wide variety of tools, nor be able to achieve unique hand gestures. The ulnar and median nerve are the two major nerves in the hand.  These nerves transmit electrical impulses to the brain, which create sensations and allow movement.
Prior to learning the details about the hand and building the clay muscles throughout the forearm, wrist, palm, and fingers I had no idea how complex the hand is.  I cannot believe how many muscles are in the hand and fingers.  I really noticed this when I was creating the extensor digitorum and flexor digitorum profundus on my manikin.  Although the hands and feet have a different appearance they are actually similar in bone construction.  I found it more challenging to draw a hand compared to the foot.  I believe this is because the fingers are longer then the toes and have the ability to create unique gestures. 

Sunday, April 10, 2011

Life Drawing and Building Clay Muscles.

   Last week was not a typical week because my class time was cut short due to advisement day.  On top of that, I also participated in mid-program review.  For those of you that are not familiar with mid-program review, it’s a benchmark for all art and art education majors.  I presented my artwork to a panel of art facility and explained why I’m an artist.  Everything went good and I passed this benchmark successfully.  It was a good learning experience, and I found it to be beneficial for me as an artist.
The time that I had in class was spent drawing the shoulders, biceps, and triceps.  I’m making my way down the arm to the forearm.  A goal from this course is to be able to accurately depict the human form in a 30 second gesture drawing.  I’m doing this well, but I still need to work on my line economy.  Some of my gesture drawings are stylized and have too much line work.  Less is better when I only have a short time period to draw the entire body.  After I do several gestures drawings to get warmed up, I then typically do an hour-long pose.  These allow me to focus on the human form and really develop accurate features and proportions.  I don’t spend a lot of time developing value or shading but I do focus on variation of line quality.
I’ve made a lot of progress on my manikin and now feel more successful when building clay muscles.  I believe the upper portion of my manikin is better then the lower because I’m really beginning to understand how muscles work.  My lower portion looks flat and several of the muscles lack a life like appearance.  Some of the clay chest and biceps muscles are a little bulkily but also look more round, three-dimensional, and life like. 


Sunday, April 3, 2011

Biceps and Triceps


The majority of my time last week was spent learning about the biceps and triceps.  I’m beginning to notice that our classroom coarse work moves at a rapid pace.  In some cases, I feel like we are moving to fast.  I would like to spend more time on individual components rather then moving onto different features every class.  I do understand that there are several components to the human body, and to understand all these features in a semester forces us to move quickly.  During this past week I was having trouble drawing and connecting all the features we’ve learned about this semester.  I think I’m going to attend the open drawing sessions again to work on my problematic areas.  An area I was having issues with last class with the muscles in the back and chest.  I find it challenging to find and accurately depict these muscles and also to be able to create contour lies to show their definition.  Maybe I could try moving closer to the model to be able to see the muscles more in depth.
The bicep is a two-headed muscle that is located on the upper portion of the arm.  Both muscle heads join together to form a single muscle belly that attaches to the upper forearm.  The biceps cross both the elbow and the shoulder joints.  Its main functions are to supinate the forearm and flex the elbow.
The triceps are a three-headed muscle that is located on the posterior side of the upper forearm.  Its main function is to allow the extension of the elbow joint. They can also fixate the elbow joint when the forearm and hand are used for movements like writing.  The three bundles of muscles all join together at the elbow and are antagonist to the biceps.