Monday, May 16, 2011

Final Reflection

http://www.flickr.com/photos/60133912@N06/sets/

The semester has come to an end and now it’s time for me to reflect on what I’ve learned.  Like most studio courses there where times when I succeeded and other times when I struggled.  This course was very informative and I learned a lot about drawing the human body.  I found life drawing to be one of the more challenging art studio courses that I have taken. 
I still remember the first day of in-class drawing.  I left that class with an extremely tired shoulder from producing so many gesture drawings.  Although I didn’t like them at first, I soon noticed their beneficial factors.  It’s interesting that in most cases my gesture drawings are proportional accurate.  Gesture drawings are the foundation to life drawing and it’s important to be able to capture an entire pose in under a minute (Gesture Drawing 1).
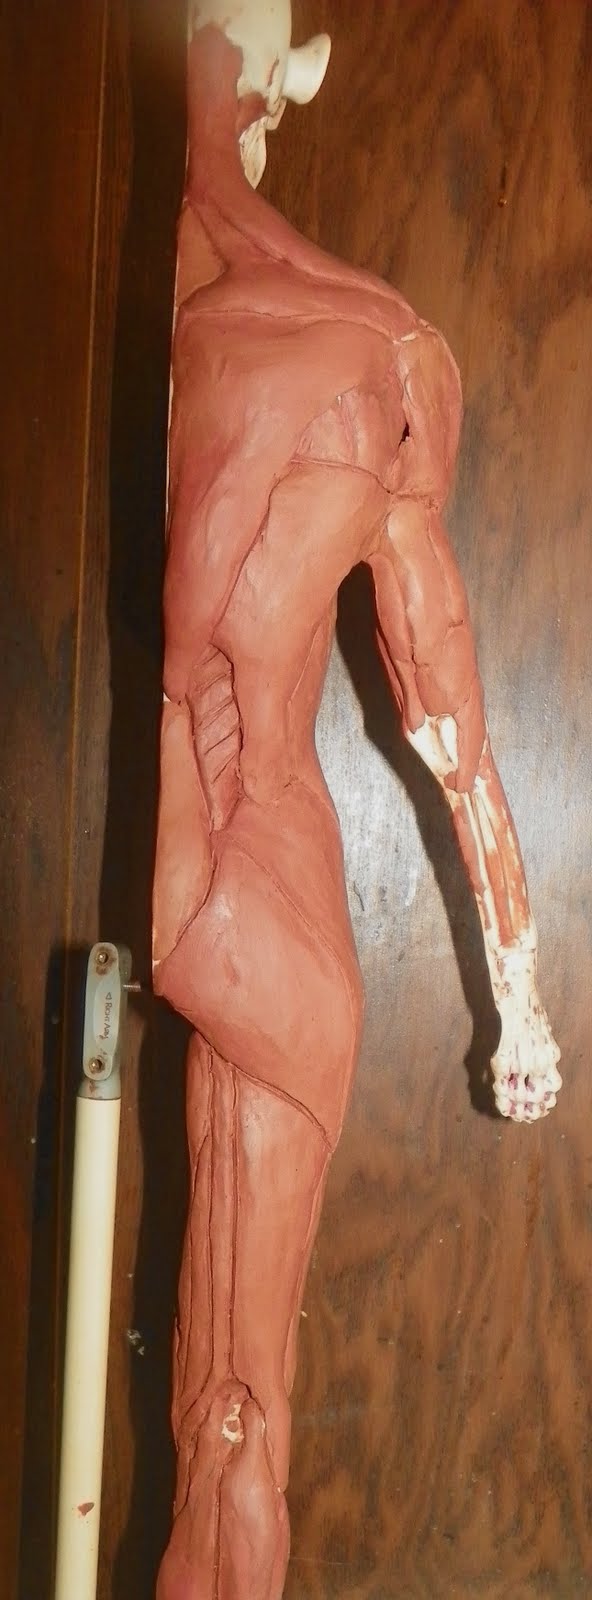
Aside from gesture drawings, the manikin was another important aspect of the course.  I spent several hours each week building clay muscles.  This allowed me to develop a deep understanding of the human muscular system and also helped me identify and accurately depict the muscles during drawings.  I worked hard on my manikin and I’m very satisfied on it turned out (Manikin 1).
The last major component of this class was based on long drawings.  This is where I was able to develop some very beautiful drawings.  Along with the beautiful drawings came struggles.  Throughout the course I struggled with contour lines and foreshortening.  I did my best this semester at trying to make theses components feel easy, but I still find them very difficult.  They are the more challenging aspects of drawing.  Overall, this course was a good learning experience and will help me become a better art educator.


Sunday, May 8, 2011

One Week Left


          My spring semester is coming to an end, and that means there is only one week of life drawing left.  It’s surprising how fast the semester has gone by.  This course has taken a lot of hard work, but it was worth it because I’ve learned so much about drawing the human body.  At this point in the semester, I’ve learned about every section of the body.   Now it’s just a matter of connecting all the pieces together. 
I had two class periods last week, the first day I spent most of my time working on my manikin, and the second day I focused on drawing.  One component of life drawing that I really enjoy is creating gesture drawings.  My favorite time length is around five-minutes.  This allows me to quickly capture the gesture, but also provides enough time for me to reevaluate my drawing and make adjustments.  It’s interesting how some poses are relatively easy while others are very challenging.  Most of the difficult gesture drawings evolve a certain degree of foreshortening.  Foreshortening is a component of life drawing that I’ve been struggling with the entire semester.  I’ve also had several issues with developing contour lines.  I understand were most of the mussels are in the body, but I find it very difficult to create contour lines to show them.  I believe contour lines are one of the more challenging aspects of drawing in general.  It’s an element of drawing that takes a lot of practice to become good at.
            Aside from drawing, my manikin has been a wonderful learning experience.  I finish the last mussels this weekend, and believe the finished product turned out very good.  I spent a lot of time making sure the mussels were built accurately.  I even ended up having to rebuild several muscles.  I had some issues with the forearm becoming too bulky and had to shave some of the muscles down. 


Friday, April 29, 2011

The Face

The majority of my time last week was spent learning about the human face.  I spent time both in and outside of class learning techniques to help me create realistic facial features.  It was an exciting week because I have been looking forward to learning how to draw the face the whole semester.  It’s a skill that I have always wanted to become better at. 
            When I begin drawing the face, I find it beneficial to do some short gesture drawings in order to understand the perspective and proportions of the facial features.  Once I have a general understanding of the layout of the face, I start my longer drawing.  I start with the shape of the head; this is an oval shape that is slightly wider at the top than on the bottom.  Then I create a vertical line down the center and a horizontal line halfway between the top and bottom of the oval.  This horizontal line is used for the placement of the eyes.  I then create another horizontal line to divide the remaining space below the eye line.  This line is used for the location of the nose.  The remaining space below the nose can be divided in half with another horizontal line.  This is used for the placement of the mouth and allows enough room for the chin.  These simple lines help me keep the face balanced and proportional.  The placement of the ears starts slightly above the eye line and ends at the bottom of the nose.  I find the eyes, nose, and month very difficult features to draw.  I understand the general shape of these facial features, but I find myself continuing to rework my drawings because I don’t feel they are realistic enough.  It really takes time to develop a nice drawing of a face.  It’s important that the face is proportional, realistic, and has a three-dimensional appearance.  It’s easy to have a drawing appear flat and not life like. 

Tuesday, April 26, 2011

Skull

Last week I spent most of my time working on the head and the skull in particular.  The human skull is a bone structure that supports the face and brain cavity.  The skull of a typical adult consists of 28 bones.  Every bone besides the mandible is joined together by sutures.  Sutures are non-movable joints that are made of bone fibers that allow flexibility.  There are 8 bones surrounding and protecting the brain, 14 bones to support the structures of the face, and 6 bones in the auditory ossicles of the middle ear.  There are slight variations between the male and female skull.  A male skull typically has more prominent ridges and temporal lines.  The female skull generally has rounder orbits and a narrower jaw.  Males often have larger mastoid processes and sinuses.  The last major difference is that the male mandible is typically squarer and thicker.
 I had two class periods last week to create three longer drawings of the skull.  Each drawing was from a different point of view.  The hardest drawing was the back three-quarter view.  I found it interesting how small the face is compared to the rest of the skull.  In my drawings prior to this class, I often focus on the face and frequently made the eyes, nose, and mouth to large.  Drawing the skull allowed me to understand the proper proportions of the face.  After completing my skull drawings, I soon noticed that the skull has a unique shape.  I now understand how the jaw moves and where the eyes fit in the skull.  I always assumed that the eyes extruded from the skull, but I now understand that they are push back and are slightly behind the forehead and cheekbones.  Overall drawing the skull was  interesting and a very good learning experience.


Sunday, April 17, 2011

Long Drawings and Hands

I was able to get a lot of in class drawing time this week, which was nice because lecture and building clay muscles can sometimes limit on how much I get to draw.  The first part of the week I continued working on the arm and forearm, and the second half was spent drawing hands.  I was able to do an hour long drawing both days this week.  In my first long drawing, the model was facing me, and I was having some issues with foreshortening, but my instructor Any Fichter helped me resolve my problem of not making the knees large enough.  They needed to be larger then I expected because they were closer then the rest of the body.

 The human hand is made up of 27 bones!  The carpus is commonly referred to as the wrist accounts for 8 bones.  The metacarpals or palm is made up of 5 bones, and the remaining 14 bones are in the fingers and thumb.  Without this complexity, we wouldn’t be able to operate such a wide variety of tools, nor be able to achieve unique hand gestures. The ulnar and median nerve are the two major nerves in the hand.  These nerves transmit electrical impulses to the brain, which create sensations and allow movement.
Prior to learning the details about the hand and building the clay muscles throughout the forearm, wrist, palm, and fingers I had no idea how complex the hand is.  I cannot believe how many muscles are in the hand and fingers.  I really noticed this when I was creating the extensor digitorum and flexor digitorum profundus on my manikin.  Although the hands and feet have a different appearance they are actually similar in bone construction.  I found it more challenging to draw a hand compared to the foot.  I believe this is because the fingers are longer then the toes and have the ability to create unique gestures. 

Sunday, April 10, 2011

Life Drawing and Building Clay Muscles.

   Last week was not a typical week because my class time was cut short due to advisement day.  On top of that, I also participated in mid-program review.  For those of you that are not familiar with mid-program review, it’s a benchmark for all art and art education majors.  I presented my artwork to a panel of art facility and explained why I’m an artist.  Everything went good and I passed this benchmark successfully.  It was a good learning experience, and I found it to be beneficial for me as an artist.
The time that I had in class was spent drawing the shoulders, biceps, and triceps.  I’m making my way down the arm to the forearm.  A goal from this course is to be able to accurately depict the human form in a 30 second gesture drawing.  I’m doing this well, but I still need to work on my line economy.  Some of my gesture drawings are stylized and have too much line work.  Less is better when I only have a short time period to draw the entire body.  After I do several gestures drawings to get warmed up, I then typically do an hour-long pose.  These allow me to focus on the human form and really develop accurate features and proportions.  I don’t spend a lot of time developing value or shading but I do focus on variation of line quality.
I’ve made a lot of progress on my manikin and now feel more successful when building clay muscles.  I believe the upper portion of my manikin is better then the lower because I’m really beginning to understand how muscles work.  My lower portion looks flat and several of the muscles lack a life like appearance.  Some of the clay chest and biceps muscles are a little bulkily but also look more round, three-dimensional, and life like. 


Sunday, April 3, 2011

Biceps and Triceps


The majority of my time last week was spent learning about the biceps and triceps.  I’m beginning to notice that our classroom coarse work moves at a rapid pace.  In some cases, I feel like we are moving to fast.  I would like to spend more time on individual components rather then moving onto different features every class.  I do understand that there are several components to the human body, and to understand all these features in a semester forces us to move quickly.  During this past week I was having trouble drawing and connecting all the features we’ve learned about this semester.  I think I’m going to attend the open drawing sessions again to work on my problematic areas.  An area I was having issues with last class with the muscles in the back and chest.  I find it challenging to find and accurately depict these muscles and also to be able to create contour lies to show their definition.  Maybe I could try moving closer to the model to be able to see the muscles more in depth.
The bicep is a two-headed muscle that is located on the upper portion of the arm.  Both muscle heads join together to form a single muscle belly that attaches to the upper forearm.  The biceps cross both the elbow and the shoulder joints.  Its main functions are to supinate the forearm and flex the elbow.
The triceps are a three-headed muscle that is located on the posterior side of the upper forearm.  Its main function is to allow the extension of the elbow joint. They can also fixate the elbow joint when the forearm and hand are used for movements like writing.  The three bundles of muscles all join together at the elbow and are antagonist to the biceps.  

Sunday, March 27, 2011

Shoulder

The majority of my time last week was spent learning about the shoulders.  At first glance they appear to be relatively simple but upon further investigation I found the bones and muscles to be very complex.  It’s interesting how the clavicle and scapula work together to support and attach the arm.  I find the human body impressive when I think about all the components working together to create a simple movement.  The idea of being able to move is often taken for granted.  If you take time to think about the components like bones, muscles, and tendons that work together you soon notice that the human body is an impressive machine.
The clavicle is often referred to as the collarbone and serves as a support beam between the scapula and the sternum.  It’s an interesting bone because it lies horizontally.  It makes up part of the shoulder and is often visible because it creates a bulge under the skin.  It’s arrangement keeps the upper limb away from the thorax and this allows the arm to have a wide range of movement.  It also allows the scapula to move freely and transmit physical impacts from the upper limb to the axial skeleton.
The scapula is commonly referred to as the shoulder blade, and connects the upper arm to the clavicle.  This bone is relatively flat and roughly triangular in shape.  The scapula is an important bone that allows upper limb movement and stability.  This bone is sturdy and well protected by muscles so it is rarely broken.  It serves as a broad plate and helps with the anchoring of muscles of the upper body.
These bones are the foundation to my manikin’s clay muscles.   Aside from drawing and learning the function of the scapula and clavicle, a lot of my time was spent creating clay muscles.  It’s interesting to see how all the muscles are beginning to overlap each other.  Some of the muscles in the back are almost like sheets that overlap muscles that I constructed earlier in the semester.

Monday, March 14, 2011

Feet

 My main focus last week was learning how to draw feet.  Like most aspects of the human form, it’s vastly important to learn about the bones within a feature prior to your first attempt of drawing it.  I found it interesting that the bones in a foot are very similar to those in the hand.  It makes sense, but I just figured since the physical appearance is different the bones must also be different.  The main difference between the hand and the foot is the length of the metatarsal and phalangeal bones.  Prior to learning the basic components of the feet, I didn’t know how to draw a foot without it appearing like Fred Flintstone’s. The main reasons why my feet didn’t appear real was that my toes always looked like tubes and I didn’t understand how to create the proper arch within a foot.
One of the challenges I have when drawing feet is achieving a three-dimensional heel.  During one of my drawings, I noticed that the heel looked flat.  I then created the back portion of the heel and leg to give it a more three dimensional appearance.  My drawing appeared somewhat geometric, but it was a good learning experience for me to discover the proper perspective of the front, back, and side of the foot and calf. 
My goal for the rest of the semester is to work on creating contour lines.  This way of drawing is challenging and evolves a lot of erasing and reworking.  One of the areas where I’m struggling with contours lines is on the ankle.  I’m having some issues with creating a realistic anklebone that doesn’t appear as if a round golf ball is under the skin.  I find the anklebone to be irregular in shape and thus a challenge to draw.   Overall, I’m begging to understand how to draw feet, but need to work on creating contour lines around the ankle.

Wednesday, March 2, 2011

Midterm


It’s officially midterm, and that means it’s time for me to reflect upon the semester.  Life drawing has been a good learning experience; I have experienced both successes and failures.  I’ve noticed a great deal of improvement in my drawing skills and understanding of the human body.  I’m now able to see the curvature of the spine, shape of the rib cage, and placement of the hips in a matter of seconds (Drawing 1).  Prior to this semester, I had very little understanding on how to draw the human body.  This was because I didn’t understanding the basic curvature and shapes that exist throughout the body.  This visualization skill has been the foundation to my learning experience.  Learning and understanding these principles has allowed me to create longer drawings that accurately portray the proportions of a human (Drawing 8).  Aside from my successes, I have also experience several challenges.  I’ve noticed that when I begin a longer drawing, it’s sometimes hard for me to create an accurate perspective.  I have also had some difficultly creating foreshortening within my drawings.  It’s a skill that I’m beginning to understand, but still find very difficult (Drawing 9).  I attended an open life drawing session recently, and found the outside drawing time to be beneficial to my learning experience.  It was nice to be able to work at my own pace and move around the room until I got a good view of the model.  I foresee myself attending these in the near future.

As I look forward to the second half of the semester there are still some things that I want to learn.  I look forward to learning how to draw hands, feet, and the face.  I typical leave these out of my drawings because I don’t feel as though I have the knowledge to accurately depict them.  I believe class lectures and building the manikin will help me develop a better understanding of these features.  Overall I have learned a lot this semester and look forward to what the future has to offer.


Sunday, February 27, 2011

This past week, I experienced some struggles and frustration during a hour-long gesture drawing.  I had a strange angle on the model, and with a full classroom space for relocation wasn’t possible.  At the half way mark of my drawing, I decided that it would be beneficial for me to start over.  So I proceeded to erase my entire drawing.  I didn’t want to start on a fresh page because I still wanted to see my pervious mistakes.  I was having some problems with the perspective and foreshortening.  Sometimes being frustrated and trying to figure something out is a good learning experience. Toward the end of my drawing I began to make some progress, but class came to an end.  I would have been able to develop a nice drawing if I had more time to fix my mistakes.  I’m going to try to attend the open life drawing session this week to get some more practice and some longer drawings.  After thinking about my mistakes, I now believe it went into the drawing way to controlled and worried about getting everything perfect.  I should have done some short gesture drawings to get a better idea the models angles.  I also think that I was working to small.  In a way, I sabotaged myself before the drawing even began.  I now know to loosen up, work large, and not be afraid to make mistakes.


EXAMPLE OF GOOD FORESHORTENING 

 Its hard for me to believe, but its already midterm time.  I need to start putting together my life drawing portfolio. This is another reason why I need to attend an open drawing session.  For my midterm portfolio I need 10 gesture drawings from a variety to time lengths.  I also need to photography my manikin from different perspectives. This will all be photographed and uploaded to my blog with a written reflection. 

Sunday, February 20, 2011

Pelvis

This was a strange week; mostly due to the Wisconsin rally that was based on preserving the rights of public employees.  As an art education major, I attended the rally, and was proud to stand up for what I believe in, however the downside was it conflicted with my class period.  The time that I did have in class was spent learning how to draw the pelvic region.  When I begin to draw the pelvis, I start with a curved triangle shape that begins at the lower portion of the spine.  This shape represents the sacrum and coccyx.  Once I have an accurate depiction of the sacrum and coccyx, I then add the hips.  The hips and the pelvic region create a sort of butterfly shape.  This concept sounds relatively simple but I do find it somewhat tricky.  Depending on how the model is positioned the hips can change drastically.  If the models pelvis is angled, it’s hard for me to see the placement of the hips, so I then work on seeing through the body and imagining where the hips should be placed.  It’s also sometimes hard to judge how much space to leave between the pelvis and the ribs.  I noticed that some of my gesture drawings looked like Parmigianino’s Madonna with the Long Neck.

It has been an interesting learning process this semester.  Focusing on one component of the human form each week has been beneficial to my learning experience of the human figure.  This prevents me from becoming overwhelmed with trying to draw the entire body all at once.  I’m beginning to realize that I knew very little about the human form prior to this class.  The most helpful element I’ve learned thus far is the ability to take the human body and break it into simple shapes.  These simple shapes are helping me build a foundation to work from. 


Sunday, February 13, 2011

Ribs and Such

This past week I spent most of my time studying the rib cage and how it aligns with the spine.  When I begin a drawing, the first mark that I make on the page is the shape of the spine.  Once I have an accurate depiction of the spinal curvature, I then draw the ribs and torso.  During gesture drawings I use an egg like shape to capture the volume of the ribs. The top of the egg is where the neck starts and the wider lower portion is beginning of the hips. This shape allows for an accurate depiction of the human form. When I started using this technique it was somewhat strange to me. I would often try and add in the shape of the shoulders, but I learned that the shoulders are something that you add at a later time.
The rib cage surrounds the chest and allows the lungs to expand during breathing.  Ribs serve to protect the heart, lungs and other internal organs  A typical human has 24 total ribs with 12 being on each side.  The first seven are connected to the vertebral column, and are called true ribs. The next three pairs of bones are referred to as false ribs. These bones are slightly shorter then the true ribs and are connected to the spine in back. The last two sets of bones are called floating ribs. Floating ribs are smaller than both the true ribs and the false ribs.
Through the continual practice of gesture drawing, I’m becoming more comfortable with my drawing skills and developing a deeper understanding of the human form.  Aside from drawing, I also have been spending time constructing clay muscles on my manikin.  This has been challenging because the muscle structure of a human is very complex.  Creating these muscles are helping me learn accurate human proportions. 


Sunday, February 6, 2011

Vertebral Column


This past week I spent a lot of time focusing on the spinal section of the human body. During class I spent a considerate amount of time drawing the shape of the spine. These were short gesture drawings that were no longer then a minute.  We also did some longer drawings, but still only focused on the shape of the spine.  One component of gesture drawings that I need to work on is economy, otherwise known as the deletion of all unnecessary parts.  I’ve learned that the spine is unique and far more complex then I previous believed.  In a typical standing position the spine is far from straight, but rather a rolling s-shaped curve. The shape of the spine is crucial for an accurate depiction of a human body.  It is the starting point for all life drawings because it leads the rest of the body.  The vertebral column is typically made up of 34 vertebras that are held together by connective tissue.  These separate components allow movement and flexibility.  The spinal cord consists of four main curves. The cervical is the first curve and this occurs the neck region. The second curve is known as the thoracic and this follows the rib cage. The third curve is the lumbar and this is located in the lower proportion of the back.  The last main curve is called the sacrum, and this occurs in lowest portion of the back.  Besides learning about the vertebral column, I also spent some time learning about connective tissue.  The first kind of connective tissue is tendons and these attach muscles to bones. These work in a way that allows or continues motion. The other kind of connective tissue is ligaments and this is bone-to-bone attachment that limits motion.  Overall the human spine is vastly complex and unique in the way that it allows movement.


Thursday, January 27, 2011

Introduction

Hello, my name is Brent Quam and I’m originally form Chaska, Minnesota but currently living in Eau Claire, Wisconsin.  While living in Minnesota, I attended Normandale Community College for my general studies.  I’m currently enrolled at the University of Wisconsin Stout for art education.  I enjoy learning new things, and have a passion for ceramics, metal art, and abstract sculpture and acrylic painting.  Some of my hobbies are spending time outdoors, cooking, and watching films.  Aside from life drawing, I’m also studying printmaking and photography.  All three of these subjects are relative new to me, and look forward to learning new skills and building a wide range of artistic abilities.
Welcome to my personal blog site.  This blog will show my life drawing progress throughout the semester.  I will be discussing my successes and struggles through weekly writings.  I will also be showing examples of my work and sharing any other information I find relevant to my learning process.  Please check back frequently for updates, fresh art work and new writing.  I encourage any questions, comments, and feedback.
I look forward to learning how to draw the human form and developing a better understanding of its human musculature system.  It has been a few years since my last drawing class so it may take some extra time and practice to revitalize some of my drawing skills.  I enjoy working three-dimensionally and believe this way of thinking will help me visualize the human figure.  I have been doing some research on figure drawing and have found several interesting resources.  One source that I spent some a lot of time looking at was http://www.britishmuseum.org.  This site contained a series of Michelangelo’s drawings.  Several of the items in this series consisted of figure drawings that used cross contour techniques to exemplify the musculature system. These drawings truly show how elaborate the human form can be.